As Hyper-V being the biggest fuzz in the Virtualization solutions today, thanks to the Microsoft marketing forces. They can generate the biggest noise about each product they produce. As a lot of people hearing the fuzz, but did not have the chance to discover Hyper-V, I have decided I will discover it and take every one with me in a Hyper-V Tour with explanation and snapshots. This discovery trip consist of 5 parts & Intro as below:
Intro: Introduction to Microsoft Windows 2008 Hyper-V RTM & Our Discovery Trip.
Part one: Microsoft Windows 2008 Hyper-V RTM Installation
Part Two: MS Hyper-V Virtual Networks Configuration & Hyper-V Server settings.
Part Three: MS Hyper-V Virtual Machine Creation.
Part Four: MS Hyper-V Virtual Machine Settings.<==
Part Five: Microsoft Hyper-V Snapshots Technology.
Bonus: Install SUSE Linux Enterprise 10 SP1 & Component Integration for Linux on Hyper-V
Part Four: MS Hyper-V Virtual Machine Settings:
In Part 3, We have created a virtual Machine with the desired configuration. In this part we are going to cover most of the settings that you can change in regard of a virtual machine. You can tune many options for your virtual machine to meet your requirement. In here we will go over most of them.
To see your Virtual Machine Setting panel right click your virtual machine and choose properties. A Virtual Machine setting Panel will open up just like the one showing in the below image.
If you look at the image above you can figure out the first page that open up is the Add Hardware panel where you can add extra virtual SCSI & Network Adapters to your virtual machine. Though notice your virtual machine have to be off for this option to be available.
The next virtual machine option is the BIOS setting. At this setting panel you can choose the boot sequence of your virtual machine as showing in the image below. Please note your VM has to be off to change the boot sequence of it.
The next Setting Panel in the list is the memory setting panel where you can change your Virtual Machine Memory size. Again your VM has to be off to change your VM memory size. The memory panel is showing in the image below:
The next panel is the processor Setting panel. At this panel you can decide how much your Hyper-V virtual machine will reserve of your physical processor and how much the max it can utilize as a percentage of the physical processor. The image below show just that and the default setting of the CPU setting.
The next few panels is all about virtual IDE devices. You can add virtual IDE CDROM & Virtual IDE HDD from these panels. In addition, you control all setting related to your virtual IDE devices from these panels. IDE Setting panels are illustrated in the images below
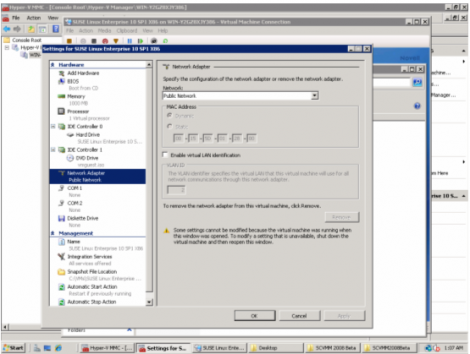
The next Panel, is the virtual machine network setting panel. This panel is very important as its where you change the virtual network the VM is connected to. In addition, at this panel you can change the VLAN that the virtual machine will use. If you desire to setup your VM MAC address manually, you will be able to do it at this pannel as well. Notice it will be necessary to turn off your virtual machine to be able to change the MAC Address of it. The Virtual Machine Network setting panel is showing in the below image.
The next panels are your virtual Machines COMs panels. It all you to setup a COM communication between your virtual machine and the physical machine. One of these panels is showing in the image below.
The next panel allow you to use a virtual floppy drive from a .flp files. An image of the floppy disk setting panel is below.
In the name panel, just as the name imply it is the place to change your VM name. The panel is showing below:
The integration services panel is next. Its the panel where you decide what integration service will be delivered to this virtual machine. A snap shot of the panel below:
The next panel allow you to choose where your VM will store its snapshots. The snapshot file location panel look as in the image below:
The last two panels in the VM setting panels allow you to choose what actions will the virtual machine take when the physical server get started/stopped. The two images below show these two panels.
Ok. Finally the end of the Hyper-V Virtual Machines setting panels. In this part, I had shown you most of the Virtual Machines setting panels. In the next Part, I will show a bit of VM Snapshoting at Part Five: Microsoft Hyper-V Snapshots Technology.
<<Previous ………………………………………………….. Next>>


