Did the title bring your attention? Have you heard that one of the main reasons for VMware ESXi was to get rid of the service console? Are you sure there is no console in VMware ESXi? The true is there is still a very tiny console in VMware ESXi, though it has way smaller foot print than the one found in the ESX version. In addition, the usage of the VMware ESXi Console Access is not supported unless if instructed by VMware to do so. Please use this tip wisely & don’t try to do wild changes using your VMware ESXi console as that is not supported. Yeah, again I would repeat its not supported :).
Hmm you still insist that you want to know how to do so, although its not supported. I can admit it, it can get to be handy if you know what you are doing. Below is the steps of how to access the ESXi Console:
To access the VMware ESXi console (Not Supported) do the following.
1. Open the console of your ESXi host, you should see a screen like the below:
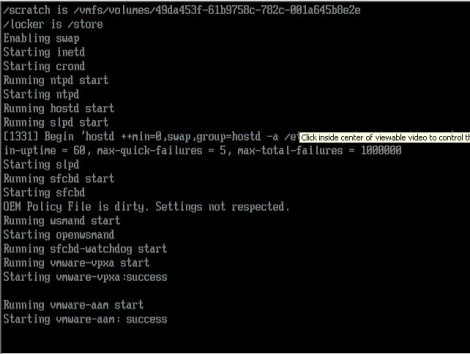
2. Use the key-combo Alt+F1, and you’ll get a virutal terminal (vtty1) with some log messages in it like below:
3- After you hit Alt+F1 & end up with the screen above, you will notice that what ever you type does not get on the screen & does not get interrupted. You will have to type ‘unsupported’ and then hit enter before anything get interrupted or viewed on the screen. As soon you type ‘unsupported‘ and then hit enter you will get the following screen:
3. As you see in the snapshot above, right after you type unsupported & hit enter, VMWare ESXi remind you that you should not use this console without consultation with VMware Tech Support. It then ask you for your password. Enter the password & hit enter. You will get to the console as the image below. Ah yes, you will be amazed of how many of your old friends still work in this tiny console (Ex: esxtop and esxcfg-mpath).
4- After completing your work in the unsupported mode, you will want to clear the screen, Exit & return to the DCUI screen. (Actually Mark has asked how to do this in the comments, so I decided I will add it in the post for future readers). Thanks Mark for asking.
- a- Enter the command clear to clear the screen of any residual from previous steps. This may be required by your local security policies.
- b- Enter the command exit to exit Tech Support Mode.
- c- Press Alt+F2 to return the server to DCUI mode.
Again I have to mention, use this console at your own risk. Your usage of the above console without VMware consultation is not supported. I mainly use it to edit the local host files, which I will show at upcoming article. I hope this help.


5 responses to “VMware ESXi – Console Access (Unsupported)”
Excuse me, but the title says “ESXi console” but your screenshot and information only applies to ESX, no “i”
Hi Stuart,
This post in particular is focused ESXi not ESX at all.
I am not sure what are you missing, maybe you did not expect that VMware ESXi have a hidden Console :).
Something to remember the use of this console without VMware Support instruction to do so is not supported, though every step in this article is possible to follow on ESXi & as you see in the snapshot these are ESXi snapshots.
I hope that answer your query,
Eiad
Hi,
How do you get back to the first screen with the version number etc. from the unsupported console?
Hi Mark,
I have edited the post & added step 4 which included how to get back to the first screen.
I hope this help you & others reading the post.
Enjoy,
Eiad
[…] The steps below show what to do after you login to the console of your VMware Server. If you are using ESX, then logging in to the service console is straight forward. If you are using ESXi, then please check out the other article in here on how to access the VMware ESXi Console: VMware ESXi – Console Access (Unsupported) […]